
Kubernetes has revolutionized how we deploy and manage applications, but keeping clusters running efficiently requires smart resource management. Autoscaling is the key to balancing performance and cost, and among the tools available, Karpenter shines as a standout solution. In this blog post, we’ll dive into why Karpenter is the best choice for Kubernetes autoscaling, exploring its benefits, mechanics, real-world applications, and more. Whether you’re new to Kubernetes or a seasoned pro, this guide will show you why Karpenter deserves your attention.
Introduction to Karpenter and Kubernetes Autoscaling
Kubernetes is an open-source platform that automates the deployment, scaling, and operation of containerized applications. It’s beloved for its flexibility and ability to handle complex workloads across distributed systems. However, as application demands ebb and flow, manually adjusting the number of nodes—essentially the servers or virtual machines in your cluster—can feel like chasing a moving target. This is where autoscaling comes into play, dynamically adapting resources to match workload needs without human intervention.
Autoscaling in Kubernetes ensures your applications have the resources they need during peak times while avoiding over-provisioning during quieter periods. It’s a critical feature for maintaining performance, minimizing downtime, and controlling costs, especially in cloud environments where every resource comes with a price tag.
Enter Karpenter, an open-source autoscaling tool designed to make Kubernetes scaling faster, smarter, and more cost-effective. Unlike older solutions that rely on rigid configurations, Karpenter takes a fresh approach, provisioning nodes on-demand and optimizing resource use in real time. In this post, we’ll unpack why Karpenter is a game-changer, from its core benefits to its vibrant community support.
Key Benefits of Using Karpenter
Karpenter isn’t just another autoscaling tool—it’s a leap forward in how Kubernetes clusters adapt to workloads. Here are the key reasons it stands out:
- Cost Savings: Karpenter minimizes waste by provisioning only the nodes your workloads need, when they need them. It supports cost-effective options like spot instances on cloud platforms, slashing bills without sacrificing reliability.
- Lightning-Fast Scaling: Speed matters in autoscaling. Karpenter reacts to workload changes in seconds, not minutes, ensuring your applications stay responsive even during sudden traffic surges.
- Ease of Use: Forget juggling multiple node groups or tweaking complex settings. Karpenter simplifies cluster management by automatically handling node provisioning and cleanup, letting you focus on your applications.
- Adaptability: Whether you’re running on AWS, Google Cloud, or another provider, Karpenter works across environments and instance types, giving you flexibility without lock-in.
Imagine running an online store during a flash sale. With Karpenter, your cluster scales up instantly to handle the rush, then scales back down when the frenzy subsides, saving you money—all without lifting a finger. These benefits make Karpenter a top pick for teams aiming to optimize their Kubernetes operations.
How Karpenter Works: A High-Level Overview
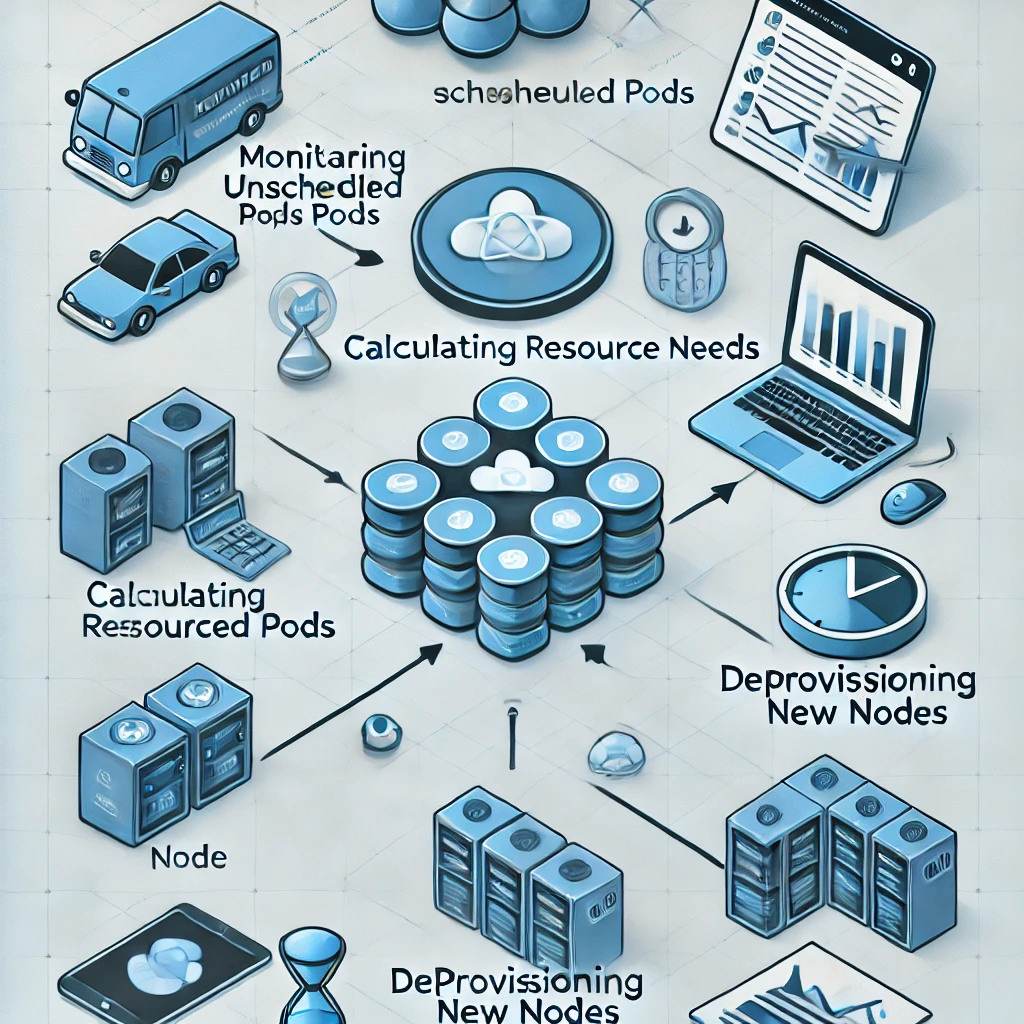
To appreciate Karpenter’s brilliance, let’s peek under the hood. Karpenter operates as a controller within your Kubernetes cluster, constantly monitoring and adjusting resources to match demand. Here’s how it works at a high level:
- Watching for Demand: Karpenter keeps an eye on unscheduled pods—those waiting for resources to run. When it spots a pod that can’t be placed, it springs into action.
- Smart Resource Matching: Instead of blindly adding nodes, Karpenter calculates exactly what’s needed—CPU, memory, or other constraints—and picks the most suitable instance type available.
- Node Provisioning: Karpenter then launches new nodes, often using cost-saving options like spot instances, and integrates them into the cluster seamlessly.
- Cleanup Duty: When workloads drop and nodes sit idle, Karpenter safely drains and terminates them, keeping your cluster lean and efficient.
What sets Karpenter apart is its speed and precision. Traditional autoscalers might take minutes to respond, relying on predefined node groups that can lead to over-provisioning. Karpenter, by contrast, acts in seconds and tailors nodes to the exact needs of your pods. This dynamic approach is powered by a clever algorithm that prioritizes efficiency, making it a standout in the Kubernetes ecosystem.
Karpenter in Action: Real-World Examples
Theory is great, but real-world results speak louder. Let’s look at how Karpenter has transformed Kubernetes clusters for actual organizations:
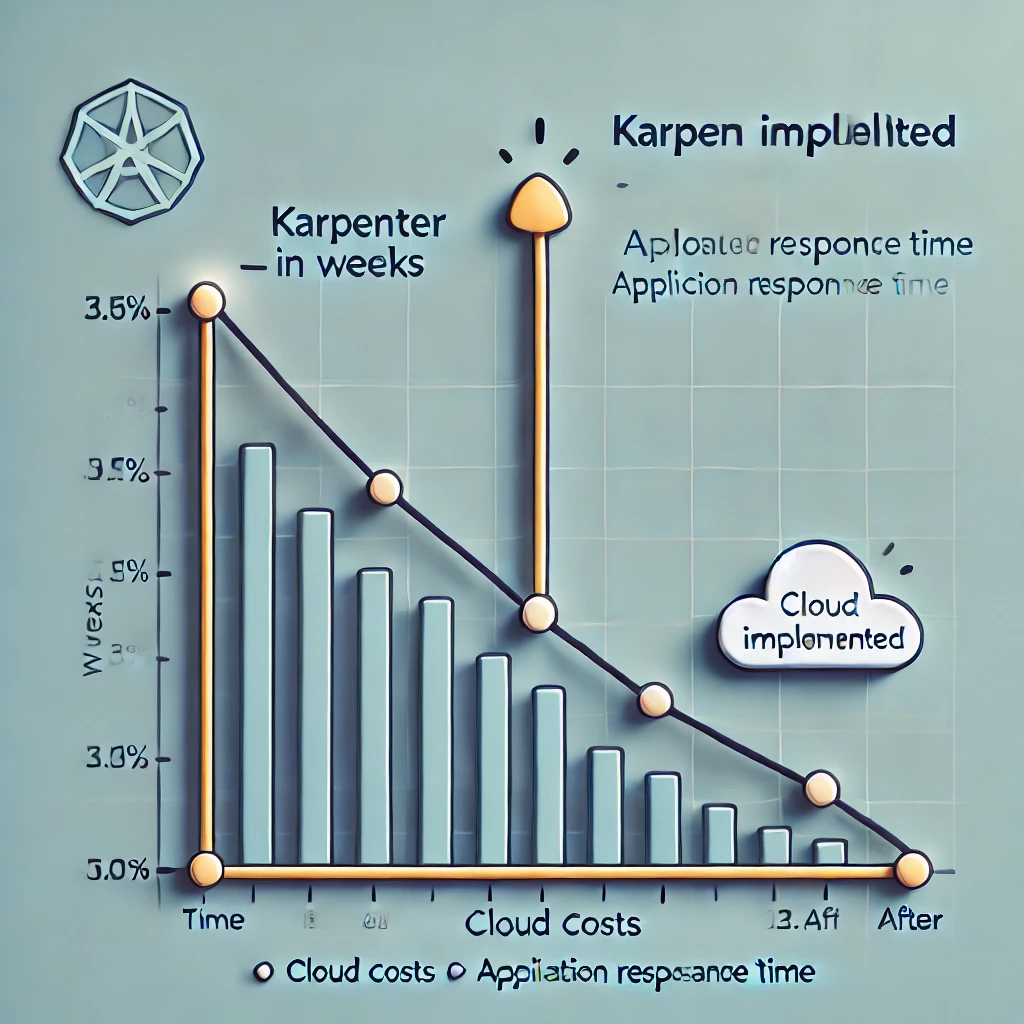
- Retail Giant During Peak Season: A major retailer faced massive traffic spikes during holiday sales. Before Karpenter, their cluster struggled to scale fast enough, leading to slowdowns. After adopting Karpenter, nodes spun up in seconds to handle the load, and scaled down just as quickly afterward, cutting their cloud costs by 35%. Shoppers enjoyed a smooth experience, and the finance team cheered the savings.
- Tech Startup with Variable Workloads: A startup building a machine learning platform had unpredictable resource needs due to training jobs. Karpenter’s ability to mix spot and on-demand instances kept costs low while ensuring models trained on time. They reported a 25% reduction in infrastructure expenses within the first month.
These stories highlight Karpenter’s knack for delivering performance and savings in high-stakes scenarios. It’s not just a tool—it’s a strategic advantage for businesses navigating dynamic workloads.
Setting Up Karpenter: A Beginner’s Guide
Ready to try Karpenter? Setting it up is easier than you might think, even if you’re new to Kubernetes. Here’s a step-by-step guide to get you started:
Prerequisites
- A Kubernetes cluster (version 1.19 or higher).
- Helm installed for easy deployment.
- Cloud provider credentials (e.g., AWS IAM role) if using a specific platform.
Installation Steps
- Add the Karpenter Helm Repository:
1helm repo add karpenter https://charts.karpenter.sh
1helm repo update - Install Karpenter:
1helm install karpenter karpenter/karpenter --namespace karpenter --create-namespace - Configure a Provisioner: Create a YAML file (e.g., provisioner.yaml) to define how Karpenter selects nodes:
apiVersion: karpenter.sh/v1alpha5
kind: Provisioner
metadata:
  name: default
spec:
  requirements:
    - key: node.kubernetes.io/instance-type
      operator: In
      values: ["t3.medium", "t3.large"]
  provider:
    subnetSelector:
      karpenter.sh/discovery: "true"
Tips for Success
- Start with small instance types to test Karpenter’s behavior.
- Monitor logs (kubectl logs -n karpenter) to troubleshoot any issues.
- Experiment with spot instances once you’re comfortable with the basics.
Within minutes, Karpenter will be running, ready to scale your cluster as workloads demand. It’s a beginner-friendly process that scales with your expertise.
Comparing Karpenter to Other Autoscaling Solutions
Karpenter isn’t the only player in town—tools like the Cluster Autoscaler have long been staples in Kubernetes. So how does Karpenter stack up?
- Speed: Karpenter provisions nodes in seconds, while Cluster Autoscaler often takes minutes due to its reliance on cloud provider APIs and node group adjustments.
- Resource Efficiency: Karpenter picks the best instance for each pod’s needs, reducing waste. Cluster Autoscaler scales entire node groups, which can lead to over-provisioning.
- Configuration: Karpenter requires minimal setup—just a provisioner definition—while Cluster Autoscaler demands preconfigured node groups, adding complexity.
- Flexibility: Karpenter supports spot instances and multi-cloud setups natively; Cluster Autoscaler’s capabilities depend heavily on the underlying provider.
That said, Cluster Autoscaler has its strengths, like tighter integration with certain cloud platforms and a longer track record. For teams needing granular control over node types, it might still appeal. But for most modern use cases, Karpenter’s speed, simplicity, and cost savings tip the scales in its favor.
Advanced Features for Power Users
Karpenter isn’t just for beginners—power users can unlock its full potential with advanced features:
- Custom Provisioners: Define multiple provisioners with specific rules, like prioritizing GPU instances for AI workloads or restricting nodes to certain zones.
- Spot Instance Optimization: Karpenter seamlessly integrates spot instances, falling back to on-demand nodes if spot availability drops, ensuring uninterrupted service.
- Taint and Toleration Support: Use Kubernetes taints to direct specific workloads to tailored nodes, enhancing cluster organization.
For example, a data science team could configure a provisioner to launch GPU-heavy nodes only for training jobs, while keeping lighter nodes for APIs—all managed by Karpenter. These capabilities make it a versatile tool for complex environments.
Also Read: From ECS to EKS a complete migration guide
Community and Support Ecosystem
A tool is only as good as its support network, and Karpenter thrives here. As an open-source project, it boasts:
- Rich Documentation: The official Karpenter site offers detailed guides, from installation to advanced configs.
- Active GitHub Presence: Developers and users collaborate on GitHub, submitting features, fixing bugs, and sharing ideas.
- Community Forums: Join the Karpenter Slack or Kubernetes forums to connect with peers and experts for real-time advice.
Backed by contributors and organizations like AWS, Karpenter’s ecosystem ensures it evolves with user needs, making it a dependable long-term choice.
Conclusion: Why Choose Karpenter for Your Kubernetes Cluster
Karpenter redefines Kubernetes autoscaling with its speed, efficiency, and simplicity. It saves money by optimizing resources, scales clusters in seconds to meet demand, and simplifies management for teams of all sizes. Real-world successes prove its value, while its beginner-friendly setup and advanced features cater to everyone from novices to experts. Backed by a thriving community, Karpenter is more than a tool—it’s the future of Kubernetes scaling.
References
For further reading and to explore the resources mentioned in this blog, check out the following links: –